Archive for the ‘Reflectives’ Category

Week 6 Year 4

Wednesday, January 5th, 2011

04 January 2011

The start of this week’s placement at Victoria hospital was fairly busy and I was able to achieve plenty of hands on experience, however by the end of the week the department was having technical problems with their equipment. I was mainly in one room for the whole of the week. On the Monday the room where I was due to be working had a problem with the table top. So we spent our time going through the appropriate examinations which were able to be performed in the room to try and keep the patients waiting time to a minimal. The work load was stream-lined to make full use of the room. By late afternoon the engineer arrived to fix the table top. Tuesday the room was up and running and the department was busy. For the next two days I really enjoyed my time in the department. I was working along side a very experienced radiographer who gave me all her attention and explained some very good techniques. One of these techniques was for a supine cervical spine examination. I have only once performed this examination and found the concept to be quite difficult to grasp, however the radiographer took the time to explain and demonstrate the procedure to allow a better understanding of the technique. Another examination she explained was in the ball catchers’ examination for rheumatology, she explained she was taught to lay the backs of the hands on the cassette and get the patient to curl their fingers slightly to look like they were going to catch something. She explained it was a necessary part of the examination was to demonstrate all joint spaces for evaluation. She explained although my technique was not wrong I could demonstrate the joint spaces better if I used her technique. I have since had the opportunity to perform the ball catchers’ examination however I have not as yet been able to perform and try the supine C-spine examination. I have previously worked with this radiographer and on every occasion she has always given me her full attention and co-operation and what I think to be valuable knowledge which I can use throughout my training.
During the week I performed an examination on a patient who was referred to the department form her General Practitioner (GP) due to onset of pain with an inability to weight bear.
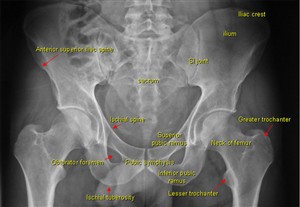
I went to the waiting room and called the patient and provided her with a gown and advised her to change for the exam. Once she had changed I advised the patient I was a student in the department and asked her consent to perform the examination. While she was entering the room she seemed uncomfortable but did not complain of any pain. Once the examination was done it became obvious from the x-ray that the patient had a fracture of both the superior and inferior pubic ramus. The procedure then was to refer the patient round to the Accident and Emergency department. Fractures of the pelvis can be caused by a direct blow, e.g. direct fall, which may cause damage to the bladder or urethra, or major blood vessels.

According to Dutton (2004), the superior pubic ramus is the most commonly fractured of the pubic rami and account for more than 70% of all pelvic fractures. Signs of a pubic rami fracture are the gradual onset of pain in the groin which is aggravated by weight bearing, walking or abduction of the thigh.
According to Misra and Holmes (2004), a simple pubic rami fracture can often be discharged with analgesia following assessment of their home situation. While unstable fractures require adequate fluid resuscitation and early fixation. Most external fixation can be treated in an A&E department by experienced personnel and considerations for potential injuries, such as urethal or rectal disruption always have to be considered.
Attached to this piece of writing are images of fractured superior and inferior pubic ramus and a Medscape document on pelvic anatomy and classifications of pelvic fractures.
Dutton, M. 2004. Orthopaedic Examination, Evaluation, and Intervention. McGraw-Hill Professional Publishing, New York, New York, USA.
Misra, R. R. and Holmes, E. J. 2004. A-Z of Emergency Radiology. Cambridge University Press, West Nyack, NY, USA
http://sinoemedicalassociation.org/orthopedicsurgery/pelvicfractures.html

http://e-radiography.net/radiology/acetabular%20fractures.pdf


Week 5 Year 4

Tuesday, January 4th, 2011

This week I was at Victoria Hospital. During my time this week I was assisting in Endoscopic retrograde cholangiopancreatography (ERCP). There was a full morning list and we were using a new room. I had previously screened ERCP patients in this hospital, however this was new equipment that I was being instructed on.
ERCPs are performed on patients who suffering from gallstones or experiencing problems such as jaundice. Ducts in the biliary system drain bile from the liver and pancreas. The biliary ducts and the pancreatic ducts join just before they drain into the upper bowel. This drainage opening is called the papilla and is surrounded by a circular muscle, called the sphincter of Oddi.
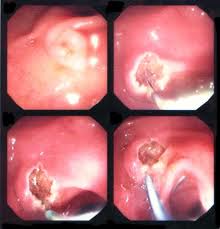
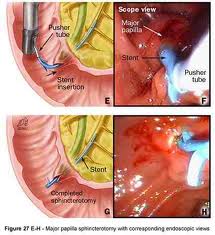
One patient due to have her gallstones removed had to have a biliary sphincterotomy. This is where the surgeon has to cut the muscle which surrounds the opening of the duct. This cut is made using a specialised catheter which has an electric current running through it. The surgeon was able to see stones in the gall bladder but was unable to remove them without performing the sphincterotomy. Once the sphincterotomy had been performed to enlarge the opening of the bile duct, the stones were able to be pulled from the duct into the bowel using a balloon attached to the catheter. Once the stones were removed the patient was experiencing a little bleeding. The surgeon then explained to me he was going to inject adrenaline around the site of the cut to try and minimise the bleeding. Epinephrine commonly referred to as adrenaline is a naturally produced hormone within the body, secreted by the medulla of the adrenal glands. Epinephrine, is used to contract the blood vessels around the site of the cut. Epinephrine is a hormone and a neurotransmitter. It can be used to increase the heart rate, contract blood vessels, and dilate air passages and participates in the fight or flight response of the sympathetic nervous system. Epinephrine is added to injectable forms of local anesthetics such as lidocaine as a vasoconstrictor.
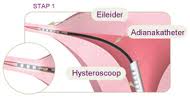
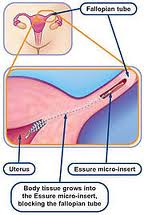
Another procedure which I performed was the screening of patients who had undergone a procedure called adiana. This procedure is a minimally invasive procedure that permanently prevents pregnancy. It works by stimulating your body’s own tissue to grow in and around tiny soft inserts that are placed inside your fallopian tubes. This is a simple procedure with a quick recovery and leaves nothing in the uterus that might limit future gynecologic procedures. It is performed by inserting a catheter into the cervix and into the uterus. This catheter delivers a low level radiofrequency (energy that generates heat to create a superficial lesion) to a small section of each fallopian tube. A tiny soft insert the size of a grain of rice is placed in each of your fallopian tubes where the radiofrequency is applied. This allows for new tissue to grow in and around the adiana inserts, eventually blocking your fallopian tubes. Patients are then sent for a hysterosalpingogram (HSG) to confirm that the tubes have been fully blocked. This test is performed to ensure that the procedure has been successful.
Attached to this piece of writing are images of both procedures.

Endoscopic Treatment for Bleeding Peptic Ulcers. 2010. Available at: http://sunzi.lib.hku.hk/hkjo/view/23/2300709.pdf [Accessed October 30 2010].
ERCP. 2010. Available at:http://emedicine.medscape.com/article/365698-imaging [Acessed October 30 2010].
Sphinterotome. 2010. Avaliable at; http://www.top5plus5.com/Procedures_files/THERAPEUTIC%20ENDOSCOPY.htm [Acessed October 30 2010].
Colonoscopy. 2011. Available at:http://www.colonoscopy-exam.info/coe/Portals/0/proc_images/procedure_images/photo14.jpg [Accessed October 30 2010].
ERCP. 2011. [online image] Avaiable at: http://www.google.co.uk/imgres?imgurl=http://www.pregnantagain.com/img [Accessed October 30 2011].
ERCP. 2011. [online image] Avaiable at:http://www.google.co.uk/imgres?imgurl=http://journals.prous.com/journals/ [Accessed October 30 2011].


Adrenaline used in surgery


Week 4 Year 3

Tuesday, January 4th, 2011

SkullThis was week 4 placement and I was now at the Western General hospital. I always like working at the Western General hospital as the staff are very willing to teach and there is lots of opportunity to get of a plenty of hands on experience.
The whole week was very busy and I gained a lot of valuable experience in all aspects of the job. One examination that made me nervous was regarding a request for a patient that was due to have a Magnetic Resonance Imaging (MRI) scan. The request was to perform an orbits examination prior to him having his MRI scan due to the pre-MRI safety check, performed by the radiographer, highlighting that this patient had previously worked with metal.
I had performed an orbits exam in the past using a skull unit but was nervous about attempting it using an up-right bucky. This was due to my lack of experience in both using this equipment and being inexperienced at performing the an orbit exam. I discussed how I was going to attempt the examination with the radiographer and we agreed I would position the patient and she would check my positioning before I proceeded to complete the exam.
The basic orbits (OM) examination as stated by Carver and Carver (2006) is performed by;
• The patient seated in front of the image receptor, (this should help to ensure some stability to the patients’ posture and balance).
• The chin is placed in contact with the midline of the image receptor and the chin position adjusted until the Orbitalmeatal Baseline (OMBL) has been raised 30˚ from the horizontal plane.
• The Medial Sagital Plane (MSP) is perpendicular to the image receptor, which is assessed by checking that the External Auditory Meatus (EAMs) or lateral margins are equidistant from the image receptor.
• Centre above the External Occipital Protuberance (EOP) to emerge level with the middle of the orbits.
• Collimate to include the orbits and maxillary sinuses.

The examination was actually straight forward and once I had had time to reflect on it then it was relatively easy. The initial fear came from trying to adapt an exam that I had previously only performed using a skull unit to performing the exam on an upright bucky. On reflection, the examination was actually easier using an upright bucky than it was using the skull unit as there was less to think about in terms of positioning the cassette and the positioning angle of the skull unit.
When positioning for any examination of the skull or facial bones it is important the patient is perfectly straight with no rotation or tilt. Common errors in positioning are caused when the MSP is not parallel to the cassette and the interpupilary line is not at 90Ëš to the film. Positioning errors can be reduced by using the eyes rather than the nose as positioning aids as it is recognised that the human body is not always symmetrical.
I have very little experience in head/skull radiography and still find it intimidating and challenging especially when trying to interpret skull images. I feel from a students’ perspective it is difficult to fully understand positioning techniques from the text books. I feel observing examinations being performed and having hands on experience in all aspects of these examinations is extremely important in all types of skull examinations. However demand for plain film imaging of the head/skull has been reduced greatly due the introduction of Computed Tomography (CT) and Magnetic Resonance imaging MRI.

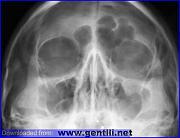
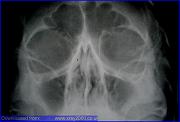
Attached to this piece of writing are images of a skull unit and images and diagrams of the skull taken from; http://www.e-radiography.net.

Clark, K.C. 2005. Clarks positioning in radiography. 12th ed. London: Arnold.


Week 3 Year 4

Tuesday, January 4th, 2011

This was my third week at Crosshouse hospital and it was my first proper opportunity to get full time patient contact due to the previous two weeks being CT and in wards and theatres.

My skills felt quite rusty due to having no proper hands on experience for such a long period of time and I felt nervous. Protocols are also different at Crosshouse but I knew this from the last placement I had there. My first two days were mentally exhausting from double checking everything but I found it really exciting.

It was quite a slow week with not many clinics however during one orthopaedic clinic I encountered an interesting problem. The request was for a right sternoclavicular joint projection. The patient had sustained an injury which had caused subluxtion of the right sternoclavicular joint and was attending the department for a review examination from the orthopaedic consultant.

I had received a few requests from this particular orthopaedic consultant that I had not encountered before and had only read about in the positioning books which I found very interesting. These requests were for lateral scapula, sternoclavicular joints and acromioclavicular joints.

I talked the examination through with one of the radiographers; however she was also not confident in performing this exam. We then got the departments positioning book out for reference but then requested the help of a more experienced radiographer. It was acknowledged this was a rare request and due to the lack of familiarity of this particular position this examination was performed by the member of staff that felt most confident.

The positioning book dictated that we use the Kurzbauer method which states it is an unobstructed lateral projection of the sterno-clavicular articulation. This describes that the patient lies on the affected side with the arm they are lying on next to their head. Using a vertical central ray, directed 15 degrees caudally and centered to the lower most sterno-clavicular articulation. This technique was used but modified by the radiographer so the patient was positioned standing with the affected side against the upright bucky.

While observing this technique it seemed straight forward and relatively easy to perform. Once the image was obtained I found it difficult to interpret and had to get the radiographer to explain what we were looking at. After interpretation of the image it was difficult to see if any changes had occurred, as there were no previous images to compare them against. It is difficult to gain experience in these examinations since they are so rare. There was only one more request for a sternoclavicular joint that day and a different radiographer performed it while being observed.

Throughout the week I started to regain my confidence slowly with the examinations that are requested more frequently. However it took some time as I struggled to remember some protocols and also had to remember how to interact with the patients (radiology information system) RIS system.

I really enjoyed the experience of the various new referrals which had been requested while this clinic was on and I am really looking forward to tackling them in the future.

Attached to this piece of writing is an orthopaedic booklet on Sternoclavicular Joint Separation and images of the shoulder and the AC joint, and also a CT scan of a patient’s right and left sternoclavicular joints. Relative to the sternum, the left medial clavicle demonstrates 4 mm of superior subluxation. There is no detectable superior subluxation of the right medial clavicle.

Pearsall, A.W. and Russell, G.V. 2000. Ipsilateral Clavicle Fracture, Sternoclavicular Joint Subluxation, and Long Thoracic Nerve Injury: An Unusual Constellation of Injuries Sustained During Wrestling. The American Journal of sports medicine 28 (6) February, pp.904-8. Available at:http://ajs.sagepub.com/content/28/6/904.full.pdf+html [Acessed October 20 2010].

Eorthopod. 2010. Sternoclavicular problems. [online] Available at: http://www.eorthopod.com/content/sternoclavicular-joint-problems [Accessed October 20 2010].

Shoulder. 2010. Available at:http://www.projectswole.com/weight-training/the-top-5-best-shoulder-exercises/ [Accessed October 20 2010].


A Patient Guide eOrthopod


Week 2 Year 4

Tuesday, January 4th, 2011

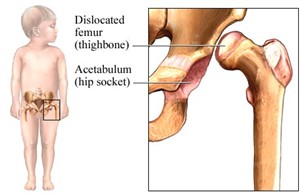
This was my second week back at Crosshouse and I had been placed to attend wards and theatres for the week. One particular morning there were two theatre cases which I found to be interesting. The first was a hip arthrogram on a 10 month old girl. The second was for an osteotomy of the hip/femur on an 11 month old female patient. Both had been born with varying degrees of Development Dysplasia of the Hip (DDH).

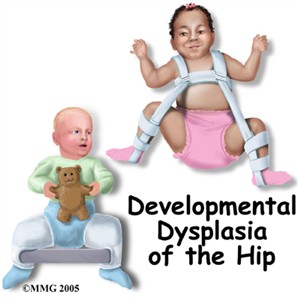
DDH is discovered as part of a routine hip examination check performed on all new born babies. High risk babies are female Caucasian as determined by Pretorius and Solomon (2006). This condition occurs when the formation of the hip joint is dysplastic (abnormal development or growth) or malformed later after birth. The femoral head of the femur and the socket of the acetabulum are made up mostly of cartilage and must be properly orientated for the correct formation. An examination described by Pretorius and Solomon (2006) describes a routine examination on new born babies as the Barlow manoeuvre which dislocates the femoral head rearwards and the Ortolani manoeuvre which reduces the recently dislocated hip usually with a resultant clunk. This examination is carried out for any subluxtion (partially out of alignment) or any instability in the hip joints. Treatments for hip dysplasia depend on the age of the patient. Treatment used for children less than six months of age is a Pavlik harness. The harness holds the hip in an abducted and flexed position. This position allows the best orientation between the femoral head and the acetabulum and allows the hip joint to remodel and develop normally. The harness is then worn full time for six to eight weeks until the hip has stabilised.

The first procedure was an arthrogram of the hip; this was being performed to allow visualisation of the hip joint space and shape. The consultant explained she was hoping to achieve good visualisation of the hip joint to determine any future treatment. An arthrogram is performed by injecting contrast media into the hip joint; this then defines the cartilage surfaces of the joint on an x-ray image. This helps the consultant determine when the hip is reduced and how much instability is present. There is also a possibility if a child reaches about twelve months of age, their hip is difficult to reduce by a closed reduction because the hip socket becomes filled with extraneous tissue and there is secondary contracture of surrounding structures. If this is the case then the patient needs to undergo an open reduction, as in this case the patient required an open reduction.

The second patient required an osteotomy. This patient had previously worn a brace to gain shape and stability of her hip; however the hip stabilised with the leg in the wrong position. The surgeon wanted to leave the hip in the joint and cut and realign the femur in the correct position. Attached to this piece of reflection are image from the osteotomy surgery. These images show the new position of the leg and the metal work used to stabilise the position.

Pretorius, S. E. and Solomon, J. A. 2006. Radiology secrets 2nd ed. Philadelphia: Elsevier.

Dislocated femur. 2011. [online image] Available at: http://samsinfo.com/wkl/developmental%20dysplasia%20of%20the%20hip%20ddh%20clicky%20hips.html [Accessed October 20 2010].

Pavlik harness. 2010. Available at; http://www.eorthopod.com/content/developmental-dysplasia-of-the-hip-in-children [Accessed October 20 2010].
Developmental Dysplasia of the hip. 2010. Available at:
http://www.pediatric-orthopedics.com/Topics/DDH___Hip_Dysp/ddh___hip_dysp.html [Accessed October 20 2010].


DDH ortho


http.web site for hip dysplasia


Week 1 Year 4

Tuesday, January 4th, 2011

This was my first week back on placement. I was at Crosshouse hospital and in Computed Tomography (CT). It was quite nerve racking being back and in my final year. It was also intimidating to be placed in CT on my first week back as I knew I was expected to perform five CT head examinations in order to prove my CT competency.
On the first day after the summer break I expected to be gently eased into the environment, however I was mistaken. As usual in any CT environment it was fast paced and on this occasion, as with my last CT placement, there was a shortage of staff. I had previously undergone a week in CT in another hospital which was also extremely busy and with a shortage of staff and this affected my confidence of achieving my required competencies.
Throughout the morning the staff explained what procedures and examinations they were performing, and it was not long before I was carrying out patient ID checks and safety checks for the administration of intravenous (IV) contrast. By early afternoon I was being talked through setting up examinations for head CT scans and by the end of the first day I had performed my first solo CT head examination. Patient ID checks are IRMER regulation and all patients under going any examination which involves ionising radiation needs to be identified by, name, address, date of birth and examination to be carried out.
Throughout the week my confidence grew, and the staff helped me relax, it felt easy to fit into the department. By the end of the week, I had performed eight CT head examinations and two abdomen/pelvis examinations. There are many reasons that head CT scans are performed. A few of the more common reasons are to detect brain injuries through trauma such as fractures of the skull or bleeds in the brain, another common referral for head CT examination are to detect bleeding due to a ruptured aneurysm or blood clots in the event of strokes.
I found utilising CT to look for pathologies extremely interesting although, due to its fast pace, there is limited amount of time to examine and study the images carefully. I also felt that, unless you were able to canulate patients and administer IV contrast, CT scanning could become very repetitive. It has very clear advantages from the patients’ point of view, the speed and ease of the examination enables patients to tolerate examination even through pain and discomfort. Even though some patients are on beds and may need to be manually transferred with the use of a PAT slide on to the CT table top, overall CT examinations seem to be well tolerated.
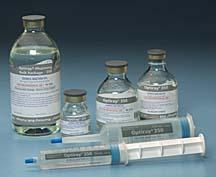
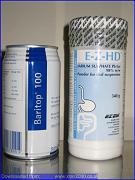
Throughout the week there were many examinations which required IV contrast. Contrast agents (which are usually an iodine compound) used in CT are available in several different forms, some of the more common contrast agents used are, Iodine, Barium, Barium sulfate and Gastrografin. These can be administered in different ways; intravenous injection, oral administration and rectal administration. IV contrast is used in CT is to help highlight blood vessels and to enhance the tissue structure of various organs such as the brain, spine, liver and kidneys.
Patients requiring any contrast agent for examinations require safety checks to be carried out. This is to determine any conditions such as diabetes, asthma or any allergic reactions they may have experienced in the past. They are then required to sign an “informed consent form” prior to having their contrast administered and CT exam. This form outlines the potential side effects of the contrast. Some patients experience mild side effects from the contrast agent such as a warm or hot “flush” during the actual injection, a “metallic” taste in the mouth, which usually lasts less than a minute and a sensation like they have to urinate. The patients are told about these potential side-effects and are reassured that these sensations quickly subside. Experiences vary depending on the type of contrast used, the rate at which it is administered and individual patient sensitivity. Milder reactions that may take place following the administration of contrast is itching over various parts of the body with hives, lasting from several minutes to several hours after the injection. This type of reaction is usually treated with medication. A more serious reaction, although much less likely, may include breathing difficulty, swelling of the throat, or swelling of other parts of the body. These reactions can be more serious if not treated immediately.
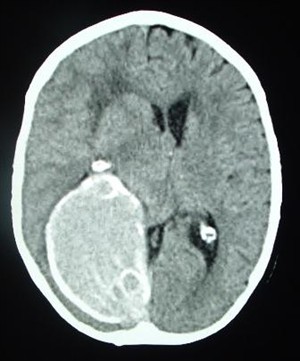
Overall my week in CT was interesting and very fast paced. I am extremely happy to have achieved my competences and enjoyed learning on new equipment. Attached to this piece of reflection is an image of a CT brain taken from,
http://www.radiologyinfo.org.


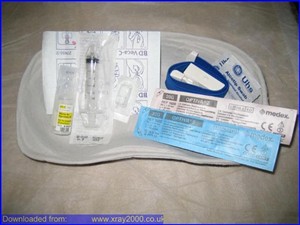
 Images taken from; http://www.e-radiography.net/index.htm, showing various contrast used in CT imaging.


contrast for CT

Week 13 Year 3

Monday, March 29th, 2010

This week was my second week at Crosshouse hospital. Crosshouse hospital is classed as the centre of excellence for Cochlear implants in Scotland. After the observation of a few patients attending the department for x-rays to check the position of the implant I then decided to do some research into the subject. I had previously only heard of cochlear implants through my studies of Magnetic Resonance Imaging (MRI) safety, and the contra indications that cochlear implants have with MRI scanning.
A cochlear implant is different from a hearing aid. These devices bypass the damaged portion of the ear and directly stimulate the auditory nerves. Signals generated by the implant are sent by way of the auditory nerve to the brain, which recognises the signals as sound. From my studies of this topic I have found out that hearing through these implants is different from normal hearing and needs to be learnt or relearned. However it does allow people to recognise things like warning signals and understand other sounds and enjoy conversations in person or by telephone.
Both children and adults who are hard of hearing or deaf can be fitted with a cochlear implant. Adults who have lost all or most of their hearing later in life can benefit from these implants, as they learn to associate the signals provided by the implants with sounds they remember. Cochlear implants, along with intensive post-implantation therapy are used as aids to help young children to acquire speech and language.
These implants are used because there is damage or destruction to the hair cells in the cochlear which results in total deafness. However even with this damage the auditory nerve can still be intact.
The cochlear implant works by conveying weak electric stimuli to the vicinity of the auditory nerve. The electric stimulus activates the nerve, which then transmits a signal to the brain. The brain then recognises the signal and the person experiences this as hearing. A cochlear implant has the same function as the hair cells, in that it transforms sound into electric current that stimulates the auditory nerves. This device can help provide a sense of sound to a person who is profoundly deaf or severely hard of hearing.
Hearing is not absolutely normal and research carried out on users who have lost their hearing later in life have stated that the acoustic impressions from the implant differ from normal hearing. Some users describe the sound as, mechanical, or synthetic. This does however change over time and the artificial sound quality is reduced or unnoticed after a few weeks.
Risks from this type of surgery may include facial nerve damage, numbness in the area of the scar, intensification of tinnitus and change in taste sensation and dizziness.
Children who are implanted very young and adults who become deaf later in life, but have already learnt to talk, respond better to the implants than adults with congenital deafness or prelingual deafness. Patients who undergo this operation have to wait 3 to 6 weeks after their operation before beginning training, so any swelling can subside and the initial fitting of the processor can be done. A program consists of 3 phases, firstly adjustment of device. This is adjusted until the patient experiences sounds as being pleasant. Audiological tests are then performed to check whether the adjustments are correct and also to find out what the patient perceives before the training begins. Then last familiarisation with the device and aural training.
The technique used for imaging patients attending the department for the positioning of a cochlear implant is called modified stenvers which is a project that I was unfamiliar with prior to working at Crosshouse hospital. I found it very interesting to see these projections being undertaken and also understanding the whole patient journey. I was also extremely surprised at how common cochlear implants were and have a better understanding in reference to MRI safety. Attached to this piece of writing are images of cochlear implants and an x-ray image.

Week 12 Year 3

Monday, March 29th, 2010

This week I have been at Crosshouse hospital. Despite the fact that this was my first time at this particular hospital and department, I was looking forward to it as it had a reputation for being a good place to work.

Following an initial tour of the department I was allocated the room where I would be working throughout the week. After familiarising myself with the room I enquired about their system and procedures regarding the examination process of patients. It was explained how the request cards are received and the order they were taken. The radiographer then took me through the entire procedure from finding a patient on the system, all the way through to post processing. The cassettes that were used at Crosshouse hospital were different from the ones I had used previously and the system of post processing was completely different to the systems I had encountered in the past.

The system they used is called Radiographic Image Interpretation System (RISS) and the Computed Radiography (CR) system they use is called an AGFA system. Both systems were completely new to me and, initially, they were quite daunting.

The AGFA system is reportedly widely used, but unfortunately for me, I had no experience of it. This system has a cassette buffer which is designed to eliminate waiting time and allows for a continuous workflow within a department. The system has an automated cassette system which requires no buttons to operate it.

The RIIS system is a computerised system used for every aspect of a patient’s medical imaging history. It aids a department to manage work flow, and maintains records of a patient’s history of examinations.

Once I learned and mastered the systems that the hospital utilises then I found them to be beneficial and quite straight-forward. However the unfamiliarity of the department, the people and the systems really compounded my difficulties on the first day.

Throughout my first day it felt like I was being bombarded with information about the new things I had to learn. One of the hardest things about working in a new department is conquering my nerves, especially when I’m on my own. Luckily I was accompanied by another student during this placement and it was comforting to be working alongside a familiar face.

On the second day I was much more relaxed and it didn’t take me long to settle in. I also became quite adept at working with the new systems as well as learning some of the more technical details of their operation.

By the end of the week I had really settled into the department, I enjoyed working with the people I had met. I had enjoyed my clinical assessment and, for the first time, I hadn’t been nervous. I also went to theatre and performed my first ever femoral nailing. This surgery was a new experience for me and one that I had been keen to observe. I really look forward to opportunities to attend theatre as I find it invaluable experience and quite exciting. This is a common procedure and one I was really looking forward to although I had been warned that it could be gory and wasn’t really for the squeamish.

After entering the theatre and setting up the machine the radiographer talked me through entering the patients’ details into the system, and then explained what was going to happen. Once the surgery was underway I was then given full control of the Image Intensifier (II) and instructed to do the screening for the surgery.

Everything was going well until the surgeon was fitting the screws at the distal end of the femur and I needed to acquire a true lateral of the knee and distal femur. The patients’ leg was supported by a stirrup and her foot supported in a boot which was angled so that it was slightly turned out laterally. This made getting a true lateral difficult. The surgeon instructed me that I needed to turn the II through to the lateral position. However the II was turned as much as it could go. I explained it only rotated 180 degrees in either direction and I would need to rotate it 360 degrees to get a true lateral. This wasn’t possible as it would mean the machine would breach the sterile area. He still insisted that he couldn’t proceed without these images and suggested that the II would rotate further than I had told him. The supervising radiographer then confirmed my assessment of the situation was correct. The surgeon then requested one of us to call the department and request a specific radiographer attend and help obtain the required images. This radiographer assists in a large number of trauma surgeries in theatre. While we waited for the other radiographer to arrive I advised the surgeon of another potential problem. It was going to prove very difficult to obtain the lateral image due to two reasons. The patient was of small stature and therefore her legs were quite short and wouldn’t raise high enough to allow the image receptor access. This problem was compounded by the fact that she also had fractures to her inferior and superior pubic ramus, so her good leg could only be supported at a certain height.

When the requested radiographer arrived we explained the problem to him and he confirmed to the surgeon the difficulties that were being experienced were not due to a problem with the machine or the staff. The problem was finally resolved by the having four nursing staff lift the patient’s good leg as high as possible and then tilting the table in order for us to obtain the required projections.

We attained the images that the surgeon required and he managed to complete the surgery successfully. When the surgery was over the nursing staff apologised for the surgeons’ attitude. It was an embarrassing situation that was difficult at the time but could have easily been avoided if the surgeon had believed what he was being advised and didn’t think the problem was due to either of us being unable to work the machine.

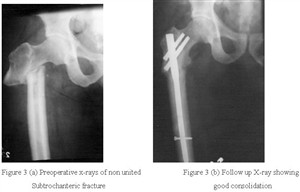
Even though this proved to be a difficult situation, I think we both dealt with it very professionally and I loved the experience of observing the surgery. Overall it has been a good week and I have really enjoyed my experience at Crosshouse hospital. Although it is nerve-wracking to enter a new department and work with equipment that I am unfamiliar with, I do find that I gain invaluable experience by doing so. It is really good experiences to see how different departments work, encountering new students from other universities and being able to compare courses and exchange views. Attached to this piece of writing are images of a femoral nailing.

Week 11 Year 3

Sunday, March 14th, 2010


This week I was in the ultrasound department at the Western General. I had previously worked in an ultrasound department as an assistant so knew what to expect.

The week mainly consisted of obstetrics, and gynecological examination with a little general ultrasound. Through out the week I observed a number of gynecological examinations on women who were perimenopausal and post menopausal. One of the main difficulties I had with these examinations was identifying the ovaries. I generally found it difficult to pick out the ovaries in pre-menopausal women but found it increasingly difficult and sometimes nearly impossible on women who were of peri and post menopausal years. Another issue with this type of exam was that the anatomy changes with women who have had a hysterectomy.

One of the more interesting cases I dealt with was a patient who attended the department for a kidney scan due to a condition called Birt-Hogg-Dube syndrome (BHD). I had never heard of this condition and asked the patient all about it. He went on to tell me he had previously had a pneumothorax and his doctor had heard a crackling in his chest. He was then sent to a cardiologist because they suspected the crackling was coming from his heart. On investigation they could not find anything wrong with his heart and continued with more tests. On further investigation it was found that the patient had tumours in both kidneys, and tests revealed BHD syndrome. This led to him undergoing a partial bi-lateral nephrectomy. The patient was on a follow up appointment checking for any reoccurrence of tumours in his kidneys. This patient had no previous skin lesions and the condition was only identified due to him having a pneumothorax.

After further research I discovered that Birt-Hogg-Dubé (BHD) syndrome is a hereditary condition that was originally identified as a skin condition by three Canadian doctors. They found certain kinds of skin lesions on the faces and necks of several members of an extended family. In recent years, more symptoms have been linked to this syndrome, namely lung collapses and kidney cancer.

BHD syndrome is caused by mutations in the folliculing gene (FLCN). People who have the mutated gene may have lung cysts or experience collapsed lungs, and may develop kidney cancer. There is no typical BHD patient.

People with BHD syndrome may have none, one, or all of the physical symptoms associated with the condition. The fact that kidney cancer can be one of the symptoms of this syndrome makes it potentially serious. However, only a small percentage of those with BHD actually develop kidney cancer.

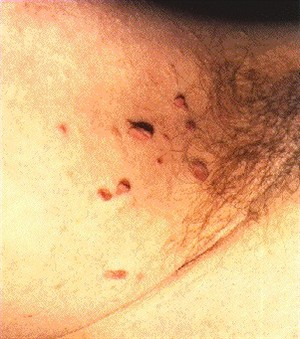
Attached to this piece of writing are images of BHD syndrome.

http://www.nature.com/jid/journal/v128/n1/full/5700959a.html

Article from the journal of investigative dermatology.

BHD syndrome


Week 10 Year 3

Saturday, March 6th, 2010

This week I was in the Royal Hospital for Sick Kids (RHSC). I had expected this week to be particularly challenging due to the different skills and techniques required while working with children. Being a mother I found myself acutely aware of the thoughts and feelings that some of the children and parents were experiencing.

There were difficulties involved in performing examinations on children while the parents were in the room, especially when the examination required immobilisation and the child was very young. I was constantly aware that I had to display professionalism and confidence in order to gain the trust of the parents, however it was a few days into the week before I was familiar enough with the environment to relax.

Over the week I encountered a number of children with medical conditions that were new to me. One patient I performed a knee examination on suffered from a condition called Dystonia (Sigawa syndrome). This condition is a rare genetic disorder which is characterised by an uncoordinated or clumsy manner of walking and dystonia. Dystonia is a general term for a group of muscle disorders generally characterised by involuntary muscle contractions that force the body into abnormal, sometimes painful, movements and positions.

The request card for this patient advised she had a previous diagnosis of dystonia in her feet, and was now experiencing the inability to straighten her left knee unless she was asleep. I found this difficult to understand how this patient was able to have her knee straight while sleeping but was unable to straighten her knee when she was awake. I have since researched this condition for a better understanding.

Dystonia in Segawa syndrome usually affects the legs; however some children may first develop dystonia in the arms. In some cases, the symptoms of Segawa syndrome may become noticeably worse or more pronounced in the afternoon and evening than in the morning. The symptoms of Segawa syndrome usually become apparent around the age of six years. Children with this condition usually show a dramatic and sustained improvement when treated with a drug called levodopa. Levodopa is an amino acid that is converted to dopamine, a brain chemical that serves as a neurotransmitter. Dopamine is deficient in children with Segawa syndrome. The disorder is caused by mutations of the GCH-1 gene.

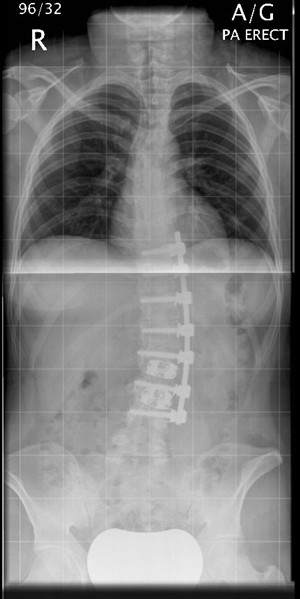
The RHSC is also the main centre for Paediatric and Young Adult Spinal Deformity (Scoliosis) in Scotland. During my time there I encountered a number of children attending for a spinal x-rays either pre-operative surgery on their spine or to review their condition to ascertain if there had been any changes in the degree of curvature to their spine. I found performing spinal examinations to be difficult. Mainly due to my lack of experience with this type of examination. I observed and assisted in a number of these examinations and gained a better understanding to what is evolved and the skills needed to produce a good image. It was not always clear by looking at some the children attending for a review x-ray that they had scoliosis until you had x-rayed them. I found it interesting to see how some children manage to compensate their posture to maintain what looks like a normal posture.

Overall my week at RHSC was very interesting and I encountered many new challenges and situations. The staff were very supportive and encouraging which helped to relax me in the new environment. I do feel, however, that I need much more experience in adapting techniques around babies and small children in order to gain confidence in this field. Attached to this piece of writing is an x-ray image of a child with scoliosis, this image is similar to images taken through the week.

http://members.optusnet.com.au/physio/scoliosis.html

A scoliosis is a lateral or sideways curve in the spine that is apparent when viewing the spine from behind.

http://www.nsd.scot.nhs.uk/services/specserv/spinaldeformity.html

Paediatric and Young Adult Spinal Deformity (Scoliosis) Scotland


?>