Archive for March, 2010

Week 13 Year 3

Monday, March 29th, 2010

This week was my second week at Crosshouse hospital. Crosshouse hospital is classed as the centre of excellence for Cochlear implants in Scotland. After the observation of a few patients attending the department for x-rays to check the position of the implant I then decided to do some research into the subject. I had previously only heard of cochlear implants through my studies of Magnetic Resonance Imaging (MRI) safety, and the contra indications that cochlear implants have with MRI scanning.
A cochlear implant is different from a hearing aid. These devices bypass the damaged portion of the ear and directly stimulate the auditory nerves. Signals generated by the implant are sent by way of the auditory nerve to the brain, which recognises the signals as sound. From my studies of this topic I have found out that hearing through these implants is different from normal hearing and needs to be learnt or relearned. However it does allow people to recognise things like warning signals and understand other sounds and enjoy conversations in person or by telephone.
Both children and adults who are hard of hearing or deaf can be fitted with a cochlear implant. Adults who have lost all or most of their hearing later in life can benefit from these implants, as they learn to associate the signals provided by the implants with sounds they remember. Cochlear implants, along with intensive post-implantation therapy are used as aids to help young children to acquire speech and language.
These implants are used because there is damage or destruction to the hair cells in the cochlear which results in total deafness. However even with this damage the auditory nerve can still be intact.
The cochlear implant works by conveying weak electric stimuli to the vicinity of the auditory nerve. The electric stimulus activates the nerve, which then transmits a signal to the brain. The brain then recognises the signal and the person experiences this as hearing. A cochlear implant has the same function as the hair cells, in that it transforms sound into electric current that stimulates the auditory nerves. This device can help provide a sense of sound to a person who is profoundly deaf or severely hard of hearing.
Hearing is not absolutely normal and research carried out on users who have lost their hearing later in life have stated that the acoustic impressions from the implant differ from normal hearing. Some users describe the sound as, mechanical, or synthetic. This does however change over time and the artificial sound quality is reduced or unnoticed after a few weeks.
Risks from this type of surgery may include facial nerve damage, numbness in the area of the scar, intensification of tinnitus and change in taste sensation and dizziness.
Children who are implanted very young and adults who become deaf later in life, but have already learnt to talk, respond better to the implants than adults with congenital deafness or prelingual deafness. Patients who undergo this operation have to wait 3 to 6 weeks after their operation before beginning training, so any swelling can subside and the initial fitting of the processor can be done. A program consists of 3 phases, firstly adjustment of device. This is adjusted until the patient experiences sounds as being pleasant. Audiological tests are then performed to check whether the adjustments are correct and also to find out what the patient perceives before the training begins. Then last familiarisation with the device and aural training.
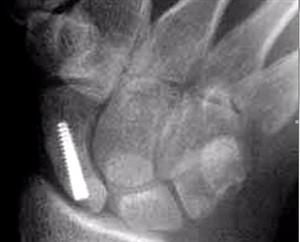
The technique used for imaging patients attending the department for the positioning of a cochlear implant is called modified stenvers which is a project that I was unfamiliar with prior to working at Crosshouse hospital. I found it very interesting to see these projections being undertaken and also understanding the whole patient journey. I was also extremely surprised at how common cochlear implants were and have a better understanding in reference to MRI safety. Attached to this piece of writing are images of cochlear implants and an x-ray image.

Week 12 Year 3

Monday, March 29th, 2010

This week I have been at Crosshouse hospital. Despite the fact that this was my first time at this particular hospital and department, I was looking forward to it as it had a reputation for being a good place to work.

Following an initial tour of the department I was allocated the room where I would be working throughout the week. After familiarising myself with the room I enquired about their system and procedures regarding the examination process of patients. It was explained how the request cards are received and the order they were taken. The radiographer then took me through the entire procedure from finding a patient on the system, all the way through to post processing. The cassettes that were used at Crosshouse hospital were different from the ones I had used previously and the system of post processing was completely different to the systems I had encountered in the past.

The system they used is called Radiographic Image Interpretation System (RISS) and the Computed Radiography (CR) system they use is called an AGFA system. Both systems were completely new to me and, initially, they were quite daunting.

The AGFA system is reportedly widely used, but unfortunately for me, I had no experience of it. This system has a cassette buffer which is designed to eliminate waiting time and allows for a continuous workflow within a department. The system has an automated cassette system which requires no buttons to operate it.

The RIIS system is a computerised system used for every aspect of a patient’s medical imaging history. It aids a department to manage work flow, and maintains records of a patient’s history of examinations.

Once I learned and mastered the systems that the hospital utilises then I found them to be beneficial and quite straight-forward. However the unfamiliarity of the department, the people and the systems really compounded my difficulties on the first day.

Throughout my first day it felt like I was being bombarded with information about the new things I had to learn. One of the hardest things about working in a new department is conquering my nerves, especially when I’m on my own. Luckily I was accompanied by another student during this placement and it was comforting to be working alongside a familiar face.

On the second day I was much more relaxed and it didn’t take me long to settle in. I also became quite adept at working with the new systems as well as learning some of the more technical details of their operation.

By the end of the week I had really settled into the department, I enjoyed working with the people I had met. I had enjoyed my clinical assessment and, for the first time, I hadn’t been nervous. I also went to theatre and performed my first ever femoral nailing. This surgery was a new experience for me and one that I had been keen to observe. I really look forward to opportunities to attend theatre as I find it invaluable experience and quite exciting. This is a common procedure and one I was really looking forward to although I had been warned that it could be gory and wasn’t really for the squeamish.

After entering the theatre and setting up the machine the radiographer talked me through entering the patients’ details into the system, and then explained what was going to happen. Once the surgery was underway I was then given full control of the Image Intensifier (II) and instructed to do the screening for the surgery.

Everything was going well until the surgeon was fitting the screws at the distal end of the femur and I needed to acquire a true lateral of the knee and distal femur. The patients’ leg was supported by a stirrup and her foot supported in a boot which was angled so that it was slightly turned out laterally. This made getting a true lateral difficult. The surgeon instructed me that I needed to turn the II through to the lateral position. However the II was turned as much as it could go. I explained it only rotated 180 degrees in either direction and I would need to rotate it 360 degrees to get a true lateral. This wasn’t possible as it would mean the machine would breach the sterile area. He still insisted that he couldn’t proceed without these images and suggested that the II would rotate further than I had told him. The supervising radiographer then confirmed my assessment of the situation was correct. The surgeon then requested one of us to call the department and request a specific radiographer attend and help obtain the required images. This radiographer assists in a large number of trauma surgeries in theatre. While we waited for the other radiographer to arrive I advised the surgeon of another potential problem. It was going to prove very difficult to obtain the lateral image due to two reasons. The patient was of small stature and therefore her legs were quite short and wouldn’t raise high enough to allow the image receptor access. This problem was compounded by the fact that she also had fractures to her inferior and superior pubic ramus, so her good leg could only be supported at a certain height.

When the requested radiographer arrived we explained the problem to him and he confirmed to the surgeon the difficulties that were being experienced were not due to a problem with the machine or the staff. The problem was finally resolved by the having four nursing staff lift the patient’s good leg as high as possible and then tilting the table in order for us to obtain the required projections.

We attained the images that the surgeon required and he managed to complete the surgery successfully. When the surgery was over the nursing staff apologised for the surgeons’ attitude. It was an embarrassing situation that was difficult at the time but could have easily been avoided if the surgeon had believed what he was being advised and didn’t think the problem was due to either of us being unable to work the machine.

Even though this proved to be a difficult situation, I think we both dealt with it very professionally and I loved the experience of observing the surgery. Overall it has been a good week and I have really enjoyed my experience at Crosshouse hospital. Although it is nerve-wracking to enter a new department and work with equipment that I am unfamiliar with, I do find that I gain invaluable experience by doing so. It is really good experiences to see how different departments work, encountering new students from other universities and being able to compare courses and exchange views. Attached to this piece of writing are images of a femoral nailing.

Clinical Record Paediatric Skeletal Year 3

Friday, March 26th, 2010
Date
Location Examination
01/03/10 – 05/03/10 RHSC Complete Spine 2 O 5 A


Femur Interlocking Nail System.pdf

Friday, March 26th, 2010

TIPSAN_OP_TEK_T2006_Femur_Interlocking_Nail_System

CPD Certificate Medical Imaging Crosshouse Hospital

Thursday, March 25th, 2010

Clinical Record Ultrasound Year 3

Saturday, March 20th, 2010
Date
Location Examination
08/03/10 – 12/03/10 Western General Abdomen 10 O
Gyneacological 12 O


Week 11 Year 3

Sunday, March 14th, 2010


This week I was in the ultrasound department at the Western General. I had previously worked in an ultrasound department as an assistant so knew what to expect.

The week mainly consisted of obstetrics, and gynecological examination with a little general ultrasound. Through out the week I observed a number of gynecological examinations on women who were perimenopausal and post menopausal. One of the main difficulties I had with these examinations was identifying the ovaries. I generally found it difficult to pick out the ovaries in pre-menopausal women but found it increasingly difficult and sometimes nearly impossible on women who were of peri and post menopausal years. Another issue with this type of exam was that the anatomy changes with women who have had a hysterectomy.

One of the more interesting cases I dealt with was a patient who attended the department for a kidney scan due to a condition called Birt-Hogg-Dube syndrome (BHD). I had never heard of this condition and asked the patient all about it. He went on to tell me he had previously had a pneumothorax and his doctor had heard a crackling in his chest. He was then sent to a cardiologist because they suspected the crackling was coming from his heart. On investigation they could not find anything wrong with his heart and continued with more tests. On further investigation it was found that the patient had tumours in both kidneys, and tests revealed BHD syndrome. This led to him undergoing a partial bi-lateral nephrectomy. The patient was on a follow up appointment checking for any reoccurrence of tumours in his kidneys. This patient had no previous skin lesions and the condition was only identified due to him having a pneumothorax.

After further research I discovered that Birt-Hogg-Dubé (BHD) syndrome is a hereditary condition that was originally identified as a skin condition by three Canadian doctors. They found certain kinds of skin lesions on the faces and necks of several members of an extended family. In recent years, more symptoms have been linked to this syndrome, namely lung collapses and kidney cancer.

BHD syndrome is caused by mutations in the folliculing gene (FLCN). People who have the mutated gene may have lung cysts or experience collapsed lungs, and may develop kidney cancer. There is no typical BHD patient.

People with BHD syndrome may have none, one, or all of the physical symptoms associated with the condition. The fact that kidney cancer can be one of the symptoms of this syndrome makes it potentially serious. However, only a small percentage of those with BHD actually develop kidney cancer.

Attached to this piece of writing are images of BHD syndrome.

http://www.nature.com/jid/journal/v128/n1/full/5700959a.html

Article from the journal of investigative dermatology.

BHD syndrome


Week 10 Year 3

Saturday, March 6th, 2010

This week I was in the Royal Hospital for Sick Kids (RHSC). I had expected this week to be particularly challenging due to the different skills and techniques required while working with children. Being a mother I found myself acutely aware of the thoughts and feelings that some of the children and parents were experiencing.

There were difficulties involved in performing examinations on children while the parents were in the room, especially when the examination required immobilisation and the child was very young. I was constantly aware that I had to display professionalism and confidence in order to gain the trust of the parents, however it was a few days into the week before I was familiar enough with the environment to relax.

Over the week I encountered a number of children with medical conditions that were new to me. One patient I performed a knee examination on suffered from a condition called Dystonia (Sigawa syndrome). This condition is a rare genetic disorder which is characterised by an uncoordinated or clumsy manner of walking and dystonia. Dystonia is a general term for a group of muscle disorders generally characterised by involuntary muscle contractions that force the body into abnormal, sometimes painful, movements and positions.

The request card for this patient advised she had a previous diagnosis of dystonia in her feet, and was now experiencing the inability to straighten her left knee unless she was asleep. I found this difficult to understand how this patient was able to have her knee straight while sleeping but was unable to straighten her knee when she was awake. I have since researched this condition for a better understanding.

Dystonia in Segawa syndrome usually affects the legs; however some children may first develop dystonia in the arms. In some cases, the symptoms of Segawa syndrome may become noticeably worse or more pronounced in the afternoon and evening than in the morning. The symptoms of Segawa syndrome usually become apparent around the age of six years. Children with this condition usually show a dramatic and sustained improvement when treated with a drug called levodopa. Levodopa is an amino acid that is converted to dopamine, a brain chemical that serves as a neurotransmitter. Dopamine is deficient in children with Segawa syndrome. The disorder is caused by mutations of the GCH-1 gene.

The RHSC is also the main centre for Paediatric and Young Adult Spinal Deformity (Scoliosis) in Scotland. During my time there I encountered a number of children attending for a spinal x-rays either pre-operative surgery on their spine or to review their condition to ascertain if there had been any changes in the degree of curvature to their spine. I found performing spinal examinations to be difficult. Mainly due to my lack of experience with this type of examination. I observed and assisted in a number of these examinations and gained a better understanding to what is evolved and the skills needed to produce a good image. It was not always clear by looking at some the children attending for a review x-ray that they had scoliosis until you had x-rayed them. I found it interesting to see how some children manage to compensate their posture to maintain what looks like a normal posture.

Overall my week at RHSC was very interesting and I encountered many new challenges and situations. The staff were very supportive and encouraging which helped to relax me in the new environment. I do feel, however, that I need much more experience in adapting techniques around babies and small children in order to gain confidence in this field. Attached to this piece of writing is an x-ray image of a child with scoliosis, this image is similar to images taken through the week.

http://members.optusnet.com.au/physio/scoliosis.html

A scoliosis is a lateral or sideways curve in the spine that is apparent when viewing the spine from behind.

http://www.nsd.scot.nhs.uk/services/specserv/spinaldeformity.html

Paediatric and Young Adult Spinal Deformity (Scoliosis) Scotland


Clinical Record Theatre Radiography Year 3

Tuesday, March 2nd, 2010


Date
Location Examination
07/12/09 – 11/12/09 Perth Royal Infirmary Scaphoid Fixation
01/03/10 – 05/03/10 RHSC Spine correction
22/03/10 – 26/03/10 Crosshouse Femoral Nailing


Clinical Record Pedeatrics Year 3

Monday, March 1st, 2010
Date
Location Examination
01/03/10 – 05/03/10 RHSC Supine Chest 4 O 5 A 1 U


Journal

This piece of writing is information on Paediatric Chest Projections taken from the Wiki Radiography website. Demonstrating the difficulties encountered with paediatric radiography.

I found paediatric radiography one of the most difficult disciplines within radiography.

Reflection

There is no difference in the diagnostic value of an antero-posterior (AP) projection compared to the postero-anterior (PA) projection of the chest in a child less than 4 years of age as the thoracic cage is essentially cylindrical in young children and magnification of mediastinal organs is insignificant (Blickman, J.G. (1994) Pediatric Radiology: The Requisites. Mosby, London). However, an AP projection is associated with a higher radiation dose to the developing breast, sternum and thyroid, and radiographers should take this into consideration when choosing the radiographic projection. In children under 4 years of age, the AP projection is often preferred due to ease of positioning and immobilisation. Young children like to see what is going on around them and positioning for an AP projection allows the child to watch the radiographer. A disadvantage of the AP projection is the likelihood of lordosis.
Antero-Posterior AP (Supine)
The patient is positioned supine with the median sagittal plane at 90° to the image receptor. A 15° foam pad is placed under the upper chest and shoulders to prevent lordosis. The chin is raised and the arms are flexed and held on either side of the head to prevent rotation. Sandbags and lead rubber are placed over the hips and legs to provide immobilisation of the legs or alternatively, the legs may be held at the knees by another radiographer or guardian. The primary beam should be centred to the area of interest thereby ensuring that effective collimation can be applied and dose reduced.
Antero-Posterior AP (Erect)
This projection can be performed with the patient standing or seated erect. For younger children, correct positioning and immobilisation are easier to maintain with the child seated. The patient is positioned initially with the posterior aspect of the chest in contact with a cassette. A 15° foam pad is then placed behind the upper chest and shoulders to prevent lordosis. The chin is raised and the arms are flexed and held on either side of the head by another radiographer or guardian to prevent rotation. The primary beam is centred to the middle of the area of interest and collimated to within the area of the cassette. Devices often used for this view are the “Fuller Chair” or “Pig O Stat”.
Postero-Anterior PA (Erect)
This projection can be performed with the patient standing or seated. The patient is positioned with the anterior aspect of the chest in contact with a cassette and their arms around it. Both shoulders should touch the cassette to ensure that there is no rotation. The cassette is positioned to include both apices and the patient’s chin is rested on the cassette top. It is often easier for a young child to maintain this position rather than the more traditional position of the hands being placed on the back of the hips. However, if you are satisfied that the child will maintain the adult position then this should be used as it is more likely to help clear the scapulae away from the chest. The primary beam is centred to the middle of the area of interest and collimated to within the area of the cassette.
Lateral
Lateral chest radiography is often easier to perform on young children if they are seated. The child sits or stands with the side under investigation closest to an appropriately sized cassette. The cassette is positioned to include the whole of the chest. The patient’s chin is raised and the arms are flexed at the elbow and held on either side of the head by a suitably protected radiographer or guardian to prevent rotation. The primary beam is centred to the middle of the area of interest and collimated to within the area of the cassette.

Radiographic Assessment of Paediatric Chest

Area of interest to be included on the radiograph
The radiograph should include the whole of the chest including the first rib to the costophrenic angles inferiorly and the outer margins of the ribs laterally. When assessing the image the PACEMAN image evaluation technique should be used.
Rotation
The chest of a young child is more cylindrical than that of an adult and therefore a small amount of rotation will lead to the appearance of significant asymmetry. Due to difficulties visualising the medial ends of the clavicles in young children, rotation is better judged using the anterior ribs, which should be of equal length and symmetrically positioned with respect to the vertebral column. Minimising patient rotation is essential as many pathological conditions may be simulated as a result of rotation (enlarged cardiac outline).

Lordosis
Lordosis is a common technical fault when performing AP chest radiographs and may be corrected by placing a 15° pad behind the patient’s shoulders and by ensuring that the arms are not hyperextended. Radiographically, lordosis can be identified when the anterior ribs appear horizontal or are angled cranially to lie above the posterior ribs. The altered position of the clavicles is not an accurate indication of lordosis in children as clavicular position changes with shoulder movement.

Artefacts
Care should be taken to avoid artefacts on children’s clothing (e.g. decals on T-shirts, or metal press studs on jumpsuits).

?>